Video Filter
How to use the Screen Capture DirectShow filter
Capture Modes
- Mouse Follow
- Region
- Screen
- Window Handle
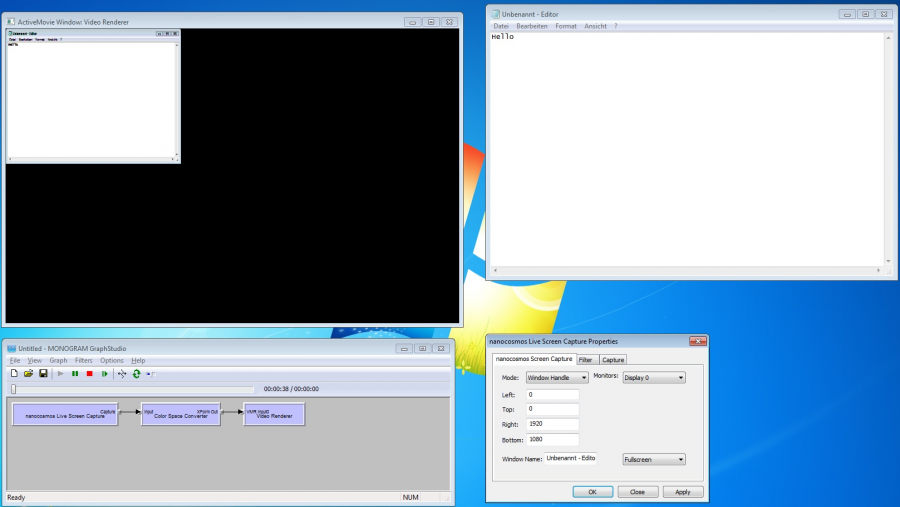
Screen Capture - Single Window
It is possible to capture a single window instead of the entire screen. The content of the window is captured even if the window is partially or completely in the background. You need to enter the Window handle or Window class name into the field.
At the moment there are two modes for capturing a single window:
Auto Size: adjusts the output size depending on the size of the window to capture, before the directshow graph is started
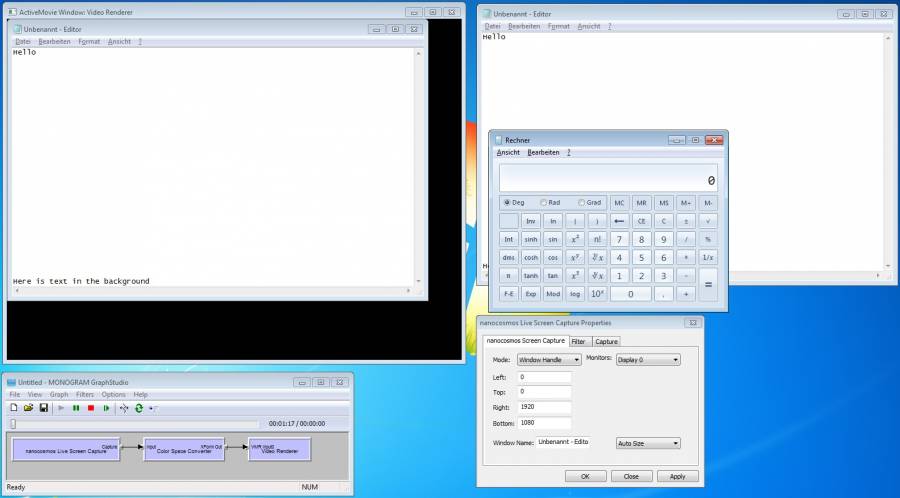
Fullscreen: the output size is equivalent to the screen size, the window size is not scaled, the window can be resized while the graph is running and one can see the whole window at all times
Scaling example: if you need to downscale a full screen capture, use the additional
Resize/Scalefunctionality in the encoder or add a resizer/scaler filter to the DirectShow filter graph
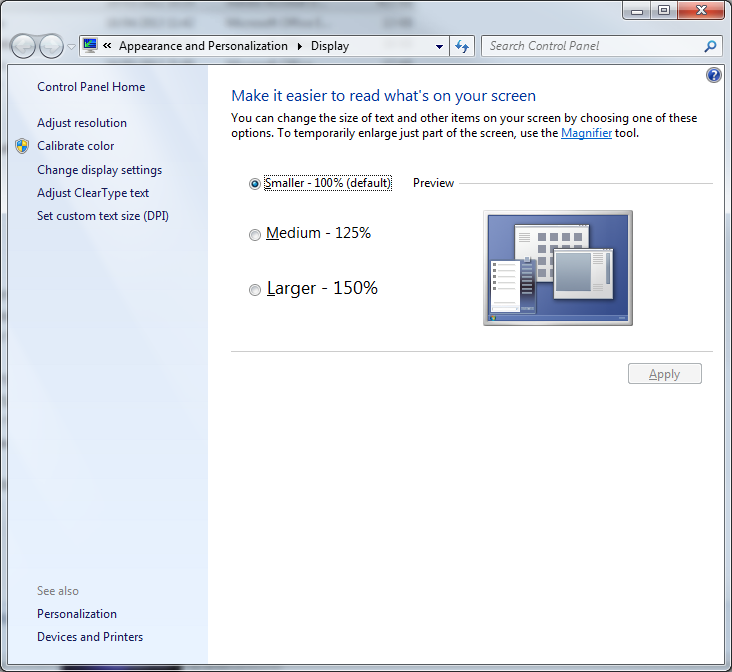
Region Capture
If the output of the region area seems to be different from the specified region, check if Windows display zoom is enabled:
Video Mixer / Picture-in-Picture
This document describes the DirectShow filter configuration for the nanocosmos Video Mixer 2.
See also the nanoStream API for the VideoMixer.
Requirements:
- DirectShow architecture / C++
- Nanocosmos Video Mixer 2 Filter
Picture-in-picture mode for 2 video inputs
This short C++ example code shows how to configure the Video Mixer to show video 2 in the right top corner of video 1.
// {0ED06AB0-B2F3-421b-BA63-2E591C932802}
static const GUID CLSID_nanoVideoMixer2 = { 0xed06ab0, 0xb2f3, 0x421b, { 0xba, 0x63, 0x2e, 0x59, 0x1c, 0x93, 0x28, 0x2 } };

// {2140722A-9F1E-4ac7-8A81-CF77CA6DD683}
static const GUID IID_IVideoPlacement = { 0x2140722a, 0x9f1e, 0x4ac7, { 0x8a, 0x81, 0xcf, 0x77, 0xca, 0x6d, 0xd6, 0x83 } };

CComPtr<IBaseFilter> m_pVideoMixer;
m_pVideoMixer.CoCreateInstance(CLSID_nanoVideoMixer2);

// target area picture-in-picture: right top corner of picture 1
RECT rcTarget = {m_VideoWidth * 7/10, m_VideoHeight*1/20,
m_VideoWidth * 9/20, m_VideoHeight * 3/10};

CComQIPtr <IVideoPlacement> api = m_pVideoMixer;
if (api){
    api->SetVideoFrameDuration( (REFERENCE_TIME)(10000000LL / m_VideoFrameRate) );
    api->SetOutputSize(m_VideoWidth, m_VideoHeight);
    RECT rc = {0,0, m_VideoWidth, m_VideoHeight};
    api->SetVideoPosition(0, &rc);
    api->SetVideoPosition(1, &rcTarget);
    return 0;
}
nanocosmos Video Mixer / Overlay
General Information
nanoStream 2.0 supports a video mixing of 2 input video signals and text and bitmap overlay functions. Both functions can be used from within nanoStream plugin applications or by using DirectShow filter setups.
Requirements:
- Nanocosmos Video Mixer DirectShow Filter (for video mixing)
- Nanocosmos Text/Bitmap Overlay Filter (for text or image overlay)
- nanoStream Plugins (optional)
- Video mixing and text/image overlay can be used independently.
Usage of Video Mixer:
Use the IVideoPlacement Interface of the VideoMixer 2 filter:
Picture-in-Picture: This example shows how to display one video source within another video source.
// specify how both capture sources should be mixed
CComPtr<IVideoPlacement> api ;
m_pVideoMixer->QueryInterface(IID_IVideoPlacement, reinterpret_cast<void**>(&api));
if (api) {
    api->SetVideoFrameDuration((REFERENCE_TIME)(10000000LL / m_VideoFrameRate) );
    api->SetOutputSize(width, height);
    RECT rc = {0,0, width, height};
    api->SetVideoPosition(0, &rc);            // specify display area for first capture source
    // target area picture-in-picture: right top corner of picture 1
    RECT rcTarget = {width * 7/10, height*1/20, width * 9/20, height * 3/10};
    api->SetVideoPosition(1, &rcTarget);     // specify display area for second capture source
}
Left/Right: Example showing how to mix two video sources side by side (left/right)
// specify how both capture sources should be mixed
CComPtr<IVideoPlacement> api ;
m_pVideoMixer->QueryInterface(IID_IVideoPlacement, reinterpret_cast<void**>(&api));
if (api) {
    api->SetVideoFrameDuration((REFERENCE_TIME)(10000000LL / videoFrameRate));
    api->SetOutputSize(videoWidth, videoHeight);
    RECT left = {0, 0, videoWidth / 2, videoHeight};
    api->SetVideoPosition(0, &left);    // specify display area for first capture source
    RECT right = {videoWidth / 2, 0, videoWidth, videoHeight};
    api->SetVideoPosition(1, &right);   // specify display area for second capture source
}
Usage of Text/Bitmap Overlay:
Text Overlay:
The text to overlay can either be copied directly to the item text buffer or can be specified by the path to a file, containing the overlay text. The text within that file is then loaded by the overlay filter.
Use the INanoTextOverlay interface of the overlay filter:
CComQIPtr<INanoTextOverlay, &IID_INanoTextOverlay> m_pTextOverlay;
m_pTextOverlay = m_pOverlayFilter;
if(m_pTextOverlay) {
    // you can add more than one item to the overlay filter, for the sake of simplicity we add only one item here
    overlay_item_t item;
    // if we draw text text overlay filter uses only top/left coords.
    // width/height of the text it determined from font params
    item.output_rect.left       = videoWidth * 1/20;
    item.output_rect.top       = videoHeight * 1/20;
    item.output_rect.bottom = videoHeight * 19/20;
    item.output_rect.right     = videoWidth * 19/20;
    item.back_color                 = COLORREF(0x00000000);
    item.text_color             = COLORREF(0x000099FF);
    item.alpha                  = 0.5;           // the opacity of the overlay text
    // (if skip color is equal to back_color then text will be drawn without background color)
    item.skip_color = COLORREF(0x00000000);

    CString text = _T("Text Overlay");  // the text that should be overlayed
    item.use_filename = false;                  // assign true, if text specifies a path to a file,
                                                                // containing text
    wcscpy(item.text, text.GetBuffer());
    item.speed                  = -2.0; //speed of string moving

    // set font properties
    item.font.lfHeight      = -8;
    item.font.lfWidth               = 0;
    item.font.lfEscapement  = 0;
    item.font.lfOrientation = 0;
    item.font.lfWeight      = FW_BOLD;
    item.font.lfItalic              = 0;
    item.font.lfUnderline       = 0;
    item.font.lfStrikeOut       = 0;
    item.font.lfCharSet     = 0;
    item.font.lfOutPrecision    = 3;
    item.font.lfClipPrecision   = 2;
    item.font.lfQuality     = DEFAULT_QUALITY;
    item.font.lfPitchAndFamily  = DEFAULT_PITCH|FF_DONTCARE;

    TCHAR fontName[100] = _T("Arial");
    _tccpy(item.font.lfFaceName, fontName);         // face name of the font

    m_pTextOverlay->AddItem(&item, NULL);       // add the item to the overlay filter
}
Picture Overlay:
The image to overlay is not loaded by the overlay filter. The image data has to be loaded beforehand. In this example the class CImage is used.
Use the INanoTextOverlay interface of the overlay filter:
CComQIPtr<INanoTextOverlay, &IID_INanoTextOverlay> m_pPicOverlay;
m_pPicOverlay = m_pOverlayFilter;
if(m_pPicOverlay) {
    overlay_item_t item;
    item.output_rect.left       = videoWidth * 1/20;
    item.output_rect.top       = videoHeight * 1/20;
    item.output_rect.bottom = videoHeight * 19/20;
    item.output_rect.right     = videoWidth * 19/20;
    item.alpha                  = 0.5;

    CString imagePath = _T("C:\temp\my_image.bmp"); // path to the image - .png and .jpg
                                                                                        // is also possible
    CImage image;
    m_Image.Load(imagePath .GetBuffer());
    item.image.data          = m_Image.GetBits();
    item.image.width     = m_Image.GetWidth();
    item.image.height    = m_Image.GetHeight();
    item.image.pitch             = m_Image.GetPitch();
    item.use_image       = true;
    item.use_image_alpha = false; // assign true for using the alpha value of png images

    m_pPicOverlay->AddItem(&item, NULL);    // add the item to the overlay filter
}
If the alpha values of a png picture should be used item.use_image_alpha has to be set to true.