Getting started with nanoStream Cloud
This guide walks you through everything required to get your first live stream running on nanoStream Cloud.
You will learn how to:
- create and manage streams with bintu (Dashboard or API),
- push live video from the browser (nanoStream Webcaster), OBS, or Osprey Talon, and
- validate playback with the H5Live player and analytics.
If you don’t have an account yet you can sign up, or get in touch with our sales team via nanocosmos.net/contact or by email at sales(at)nanocosmos.net.
Need help accessing an existing organization or unsure how to proceed?
👉 Check the Authentication section in our docs for step-by-step guidance on creating an account, logging in or requesting access from your system administrator.
Quick start
- Signup/login to the Dashboard: dashboard.nanostream.cloud
- Create a new stream in the Dashboard (or via the bintu API).
- Copy the Ingest URL and Stream name.
- Start your encoder (nanoStream Webcaster / OBS / Osprey / …) and paste the ingest details.
- Open the Playback URL in a browser and share it with your audience.
Prerequisite
To create and broadcast a live stream, you need a capture device for your live content, like a webcam or external camera. You can also send a live stream from your screen (for presentations and game streaming). For sending your live video to the nanoStream platform, you will need streaming encoder software, hardware, or just your web browser.
If you plan to use the REST API, you'll need the API Key / Bintu Token, available in the Dashboard under your organization's settings: dashboard.nanostream.cloud/organisation/overview. Only nanoAdmin have permission to access API keys.
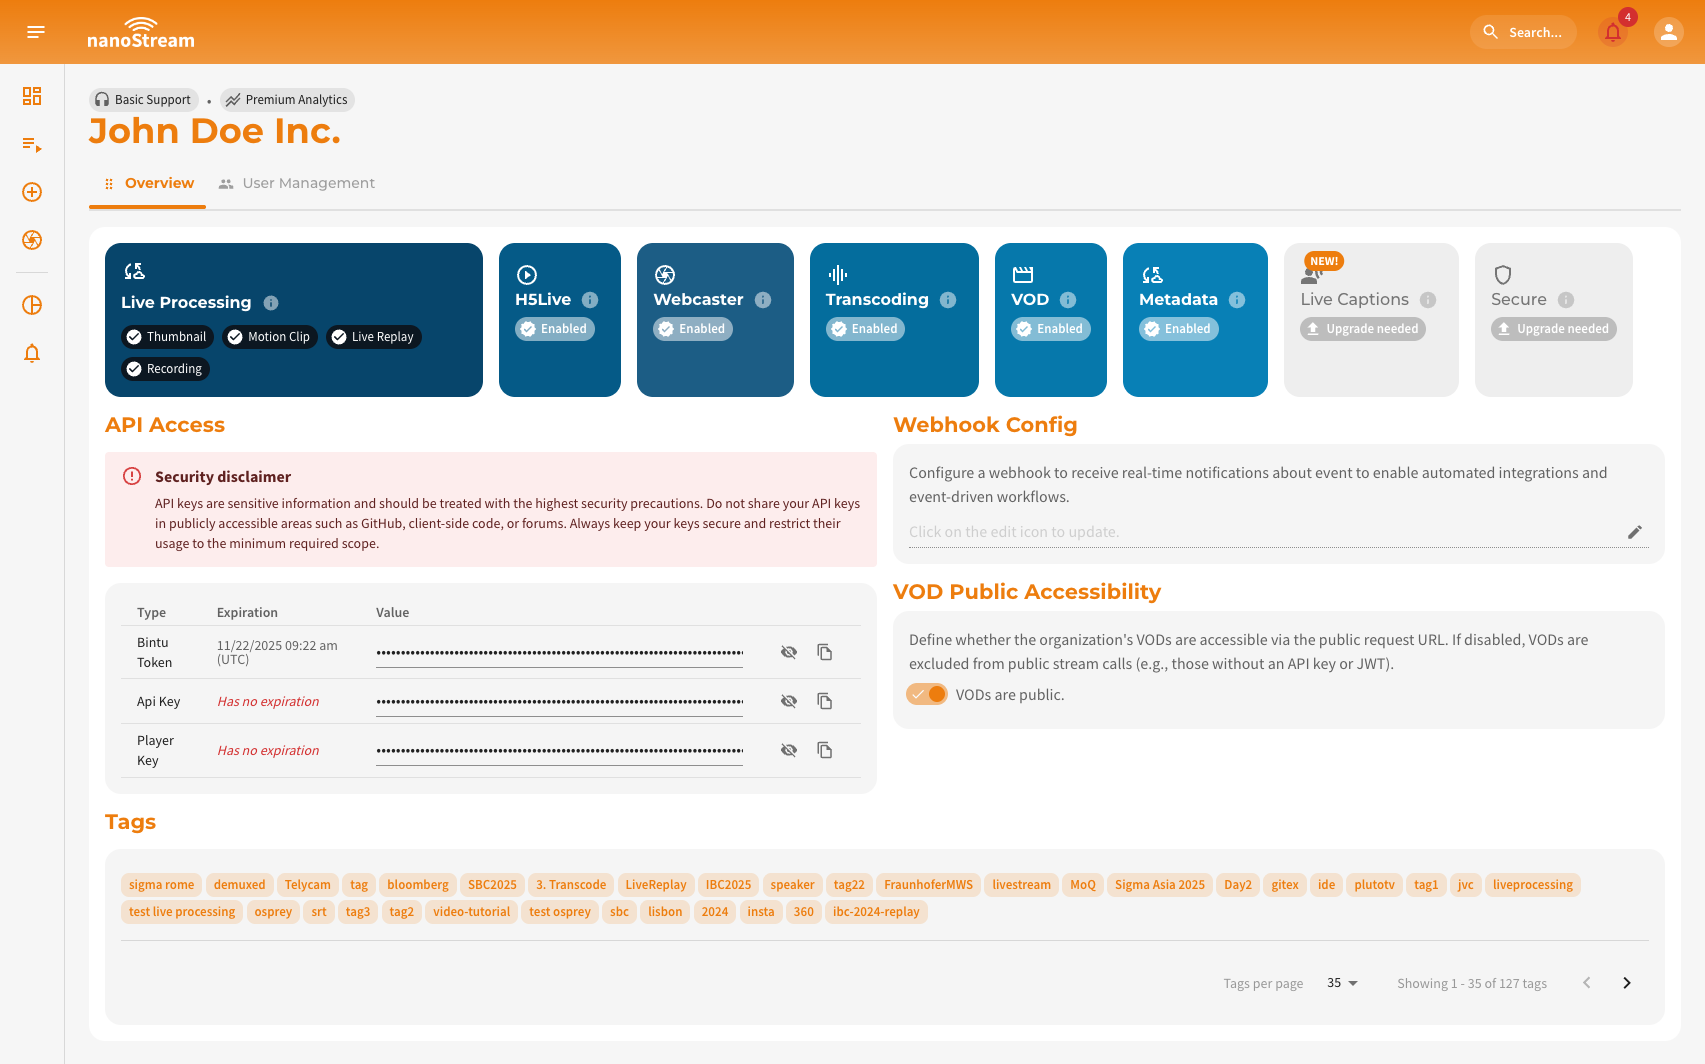 Screenshot: Organisation Overview with API Access
Create a Stream
Using the nanoStream Dashboard or bintu REST API, you can either create a new single stream or a new multi-bitrate stream with live transcoding for Adaptive Bitrate playback (ABR).
A multi-bitrate stream (MBR) is transcoded into streams of varying quality to enable the playback of streams with extremely low latency at low bandwidth (Adaptive Bitrate, ABR).
Read more about multi-bitrate, transcoding and adaptive bitrate streaming.
Permission Overview
The following roles can create a stream:
| nanoAdmin | nanoUser | nanoReadOnly |
|---|---|---|
| ✓ | ✓ | ✗ |
Rest API
You can use the API to create a stream with the Create Stream API call and various request samples in our bintu Rest API documentation: doc.pages.nanocosmos.de/bintuapi-docs. There you can also learn how to read the responses. A cURL request may look as follows:
BINTU_APIKEY=your-bintu-apikey
curl --request POST \
  --url https://bintu.nanocosmos.de/stream \
  --header "x-bintu-apikey: $BINTU_APIKEY" \
  --header 'content-type: application/json' \
  --data '{
    "tags": ["foo", "bar"],
    "processing": [
      [
        { "id": "replay", "duration": 30 },
        { "id": "thumbs", "interval": 45 },
        { "id": "rec", "duration": null },
        { "id": "motionclip", "duration": 5, "interval": 30 }
      ]
    ]
  }'
For additional languages, advanced configuration options, and complete request/response samples, please refer to the official bintu API documentation: doc.pages.nanocosmos.de/bintuapi-docs.
The API reference provides full details on all available endpoints and workflows for managing stream options, including the topic discussed in this section.
Dashboard
Navigate to dashboard.nanostream.cloud/stream/create and set up your stream.
To learn more about stream creation with the dashboard and setting tags, transcoding profiles, and options such as live processing, check out our dedicated documentation: Create Stream.
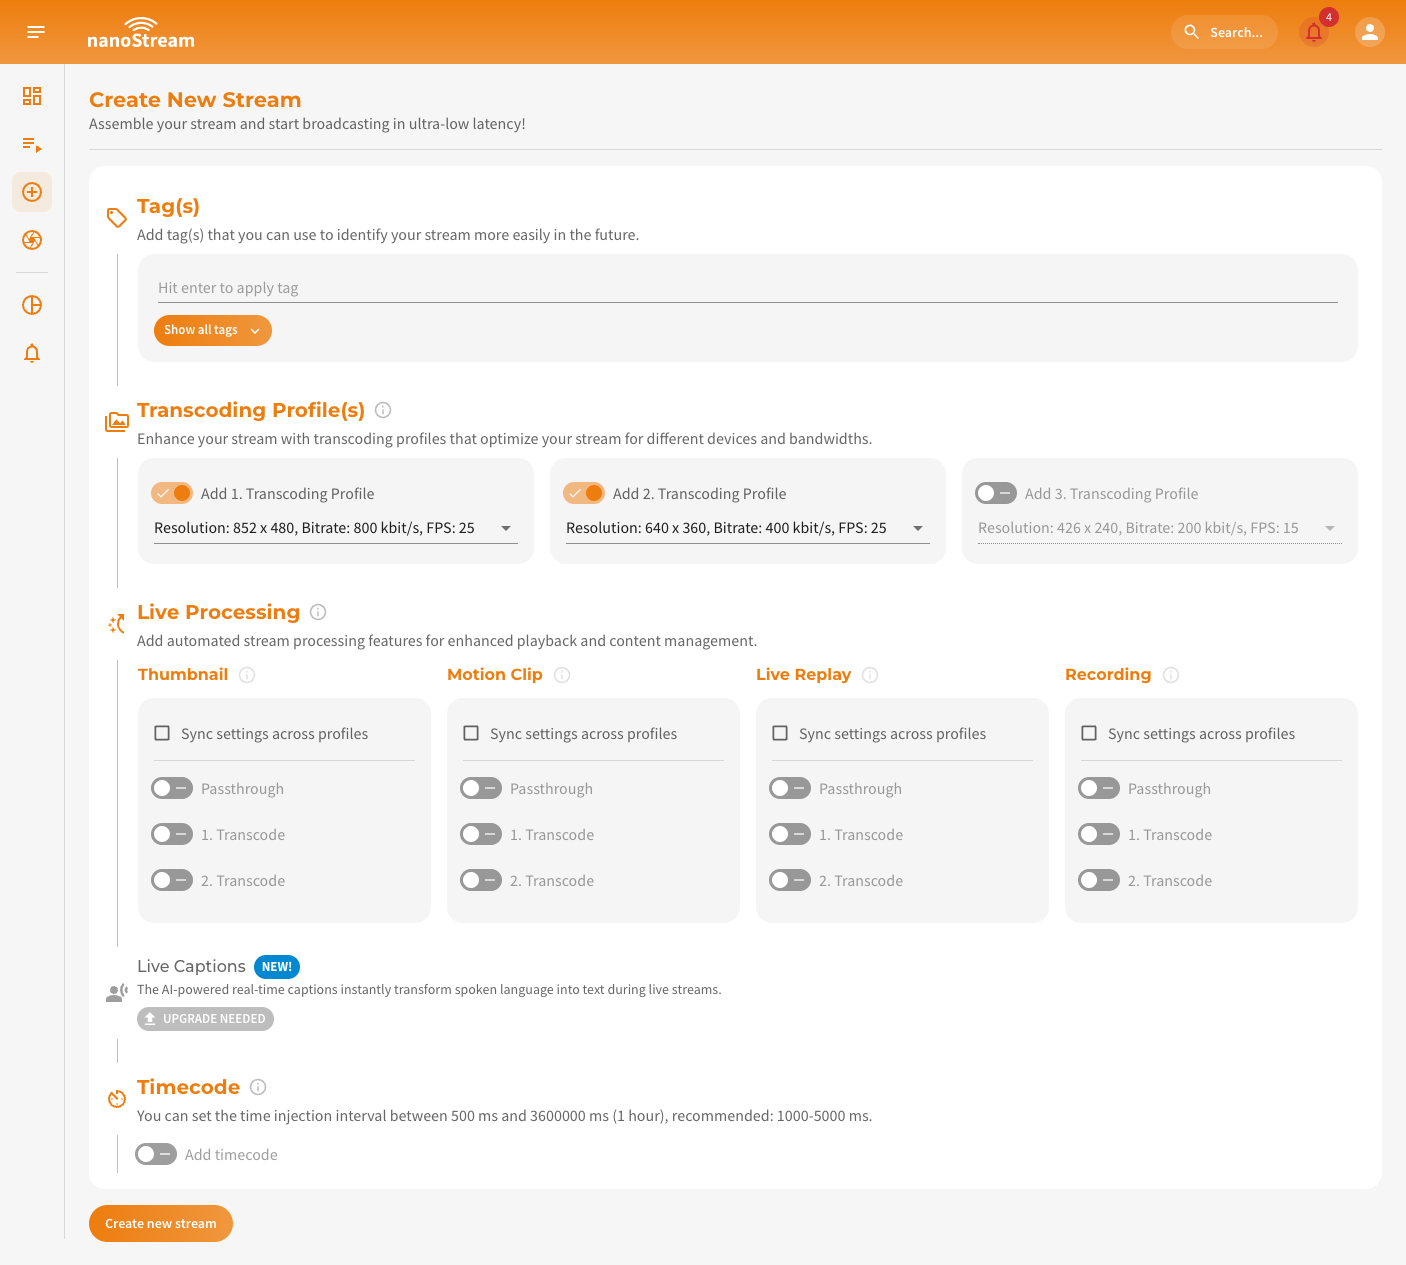 Screenshot: Create new Stream
Start a stream
You can ingest streams through popular protocols such as RTMP, SRT, WHIP, and browser-based with WebRTC. nanoStream Cloud integrates easily with industry-standard tools like OBS or Osprey Talon. For instant browser-based streaming, the nanoStream Webcaster lets you broadcast directly without any plugins or third-party software.
| Setting | Recommendation |
|---|---|
| Video Codec | H.264 |
| Audio Codec | AAC |
| Resolution | flexible, e.g. 640×480, 1280×720, 1920×1080 |
| Bitrate | flexible, e.g. 500 kbits/s, 1 MBit/s |
- OBS Studio
- ffmpeg
- nanoStream Webcaster
- Osprey Talon
OBS Studio (Open Broadcaster Software) is a free, powerful software for professional live streaming. It allows you to broadcast to nanoStream Cloud while giving full control over video quality, bitrate, and encoder settings.
OBS offers nanoStream Cloud as a streaming service for automatic setup, making configuration simple and fast.
Steps:
- Download & Install OBS Studio.
- Open OBS and go to
Settings → Stream. - Under Service, select
Other… → nanoStream Cloud/bintu. - Enter the Stream Key, known as Stream name in nanoStream Cloud Dashboard (e.g.,
ABCDE-XYZ12). - Configure video source (add source, arrange overlays, etc.)
- Start Streaming around the world!
- Check your nanoStream Cloud Dashboard to confirm that the live stream is running.
Learn how to start and share a stream, including the necessary steps and details for a seamless setup here.
If you need more guidance, read our extended blog post about Low Latency OBS: How to use OBS for Low Latency Live Encoding to nanoStream Cloud.
Video Tutorial: Set up OBS with nanoStream Cloud
ffmpeg is a free command-line tool that pushes an RTMP stream from a file or capture device to nanoStream Cloud, with no GUI required. Use it to send a quick test stream or to automate ingest on a server.
Quick start: replace <STREAM_KEY> and run:
STREAM_KEY=XXXXX-YYYYY ffmpeg -re -i input.mp4 \
  -c:v libx264 -preset veryfast -tune zerolatency -g 50 -b:v 1000k \
  -c:a aac -b:a 128k \
  -f flv rtmp://bintu-stream.nanocosmos.de/live/$STREAM_KEY
The $STREAM_KEY is the Stream name of your stream in the nanoStream Cloud Dashboard (e.g., ABCDE-XYZ12), shown in the stream overview.
-g 50 sets a keyframe interval of about 2 seconds at 25 fps. Adjust resolution and bitrate to your content, see the General Recommendations.
The nanoStream Webcaster is a browser-based encoder that requires no installation or plugins. It is ideal for quick broadcasts live streaming setups.
You can stream directly from your browser by going to dashboard.nanostream.cloud/webcaster and creating a new stream or by selecting an existing one. Alternatively, it is possible to manually append the stream ID to the URL at any time, e.g. dashboard.nanostream.cloud/webcaster/YOUR-STREAM-ID.
Steps:
- Open the Webcaster via Dashboard → Webcaster
- Select or create a Stream
- Choose camera and microphone
- Click Start Broadcast
To learn more about how to set up the webcaster and process the stream, simply refer to our dedicated docs: Ingesting with the nanoStream Webcaster.
If you prefer to integrate the nanoStream Webcaster into your own web page, follow our Webcaster getting started guide.
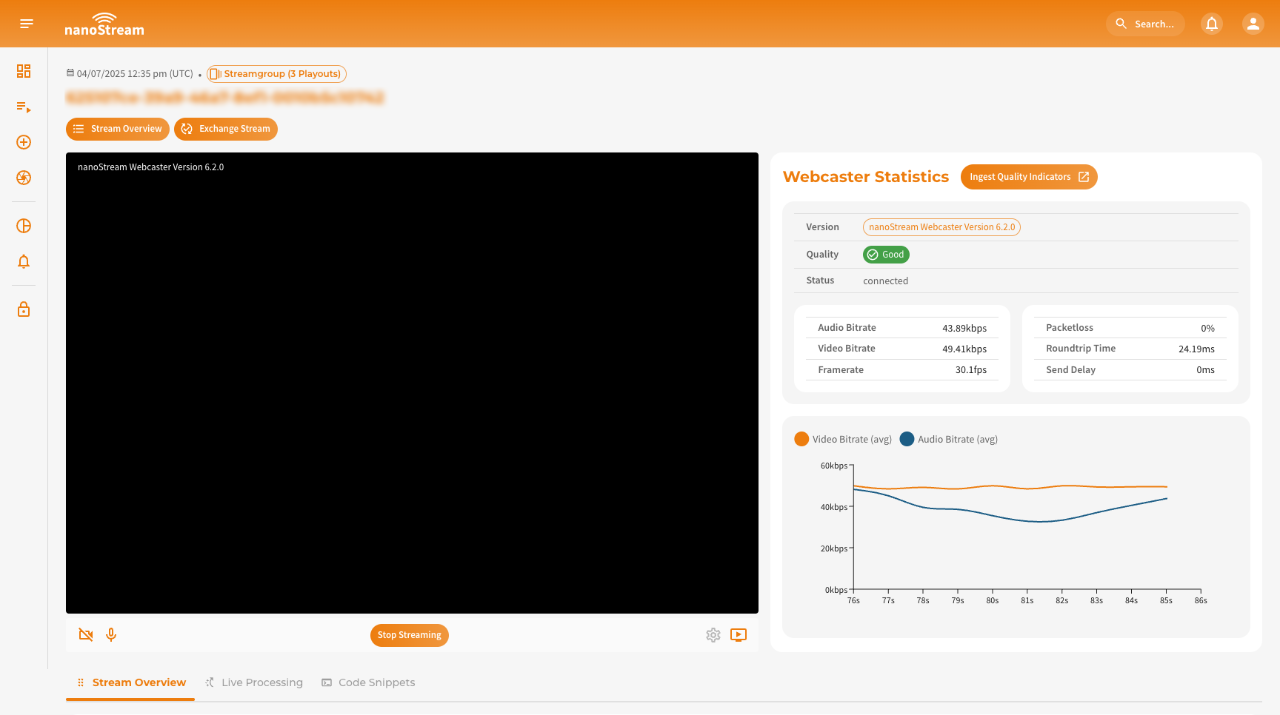 Screenshot: nanoStream Webcaster
Osprey Talon is a professional hardware encoder that allows you to broadcast high-quality, ultra-low-latency streams to nanoStream Cloud. This guide walks you through configuring your device for RTMP, SRT, and WHIP ingestion.
Step 1: Login to your Osprey Device
Access your Osprey Talon via a web browser using the device IP.
Default credentials: Username: admin / Password: osprey
Step 2: Select the Upstream Protocol
Osprey Talon supports multiple protocols for live ingest. nanoStream Cloud supports RTMP, SRT, and WHIP. You can find the appropriate ingest URL and stream name in your nanoStream Cloud Dashboard in the stream overview.
Once logged in, navigate to Output → Upstream Protocol to configure the first channel.
a) RTMP
For the most common setup:
- Select
nanocosmos (RTMP)orRTMP/RTMPSin the Protocol dropdown. - In the
Destination URL, enter your RTMP ingest URL (e.g.,rtmp://bintu-stream.nanocosmos.de/live). - Enter the Stream Key, known as Stream name in nanoStream Cloud Dashboard (e.g.,
ABCDE-XYZ12).
b) SRT
SRT provides reliable streaming over unpredictable networks and can be used as an alternative to RTMP.
- Select TS over SRT as the protocol.
- Set SRT Mode:
Caller. - Destination Address:
bintu-srt.nanocosmos.de. - Port:
5000.
SRT is ideal for low-latency streaming in challenging network conditions, as it handles packet loss and jitter automatically.
c) WHIP (WebRTC-based Ingest)
WHIP allows browser-friendly, ultra-low-latency ingest via WebRTC.
- Select nanocosmos WHIP as the protocol.
- Enter the Stream Key, known as Stream name in nanoStream Cloud Dashboard (e.g.,
ABCDE-XYZ12).
WHIP is recommended for scenarios where ultra-low latency and direct WebRTC playback are required, such as interactive webinars or live betting.
Step 3: Video Configuration & Start Your Broadcast
- Configure the video source, resolution, and encoding settings for your broadcast.
- Click
Actions → Startto begin streaming. - Check your nanoStream Cloud Dashboard to confirm that the live stream is running.
If you need more guidance, have a look at our blog post Tutorial: Osprey Talon and nanoStream Cloud.
Play your live stream
Playing streams is straightforward. You can either copy the playback URL from the dashboard, figure it out through the API, or assemble it yourself:
- dashboard.nanostream.cloud/playout/[YOUR-STREAM-ID]
- http://demo.nanocosmos.de/nanoplayer/release/nanoplayer.html?bintu.apiurl=https://bintu.nanocosmos.de&bintu.streamid=[YOUR-STREAM-ID]
Please note that for organisations that have secure option enabled, you either must be logged in to the dashboard, or if you're using the demo player you must include a token in the URL.
Permission Overview
If the account that created the stream is enabled for playback token security, a secure token is required in order to play it back. The token can only be created in the dashboard or API by an nanoAdmin.
| nanoAdmin | nanoUser | nanoReadOnly | Non-logged-in Person |
|---|---|---|---|
| ✓ | ✓* | ✓* | ✓* |
* For secure organisation accounts only with valid playback token
Get Stream Info Through Rest API
You can find all the details for the Get Stream Info API Call. There you can also learn how to read the responses. The cURL request may look as follows:
BINTU_APIKEY=your-bintu-apikey
STREAM_ID=your-stream-id-or-streamname
curl --request GET \
  --url "https://bintu.nanocosmos.de/stream/${STREAM_ID}?asset_limit=10" \
  --header "x-bintu-apikey: ${BINTU_APIKEY}" \
  --header "accept: application/json"
Get Stream Info Through Dashboard
The playback URL can be located in various areas of the dashboard:
- Playout Overview
dashboard.nanostream.cloud/playout/YOUR-STREAM-ID
- Stream Overview
dashboard.nanostream.cloud/stream/YOUR-STREAM-IDdashboard.nanostream.cloud/stream/YOUR-STREAM-ID/code-snippets
- New Stream Overview / Stream Instructions Overview
dashboard.nanostream.cloud/stream/new/YOUR-STREAM-ID
- Webcaster Overview
dashboard.nanostream.cloud/webcaster/YOUR-STREAM-ID
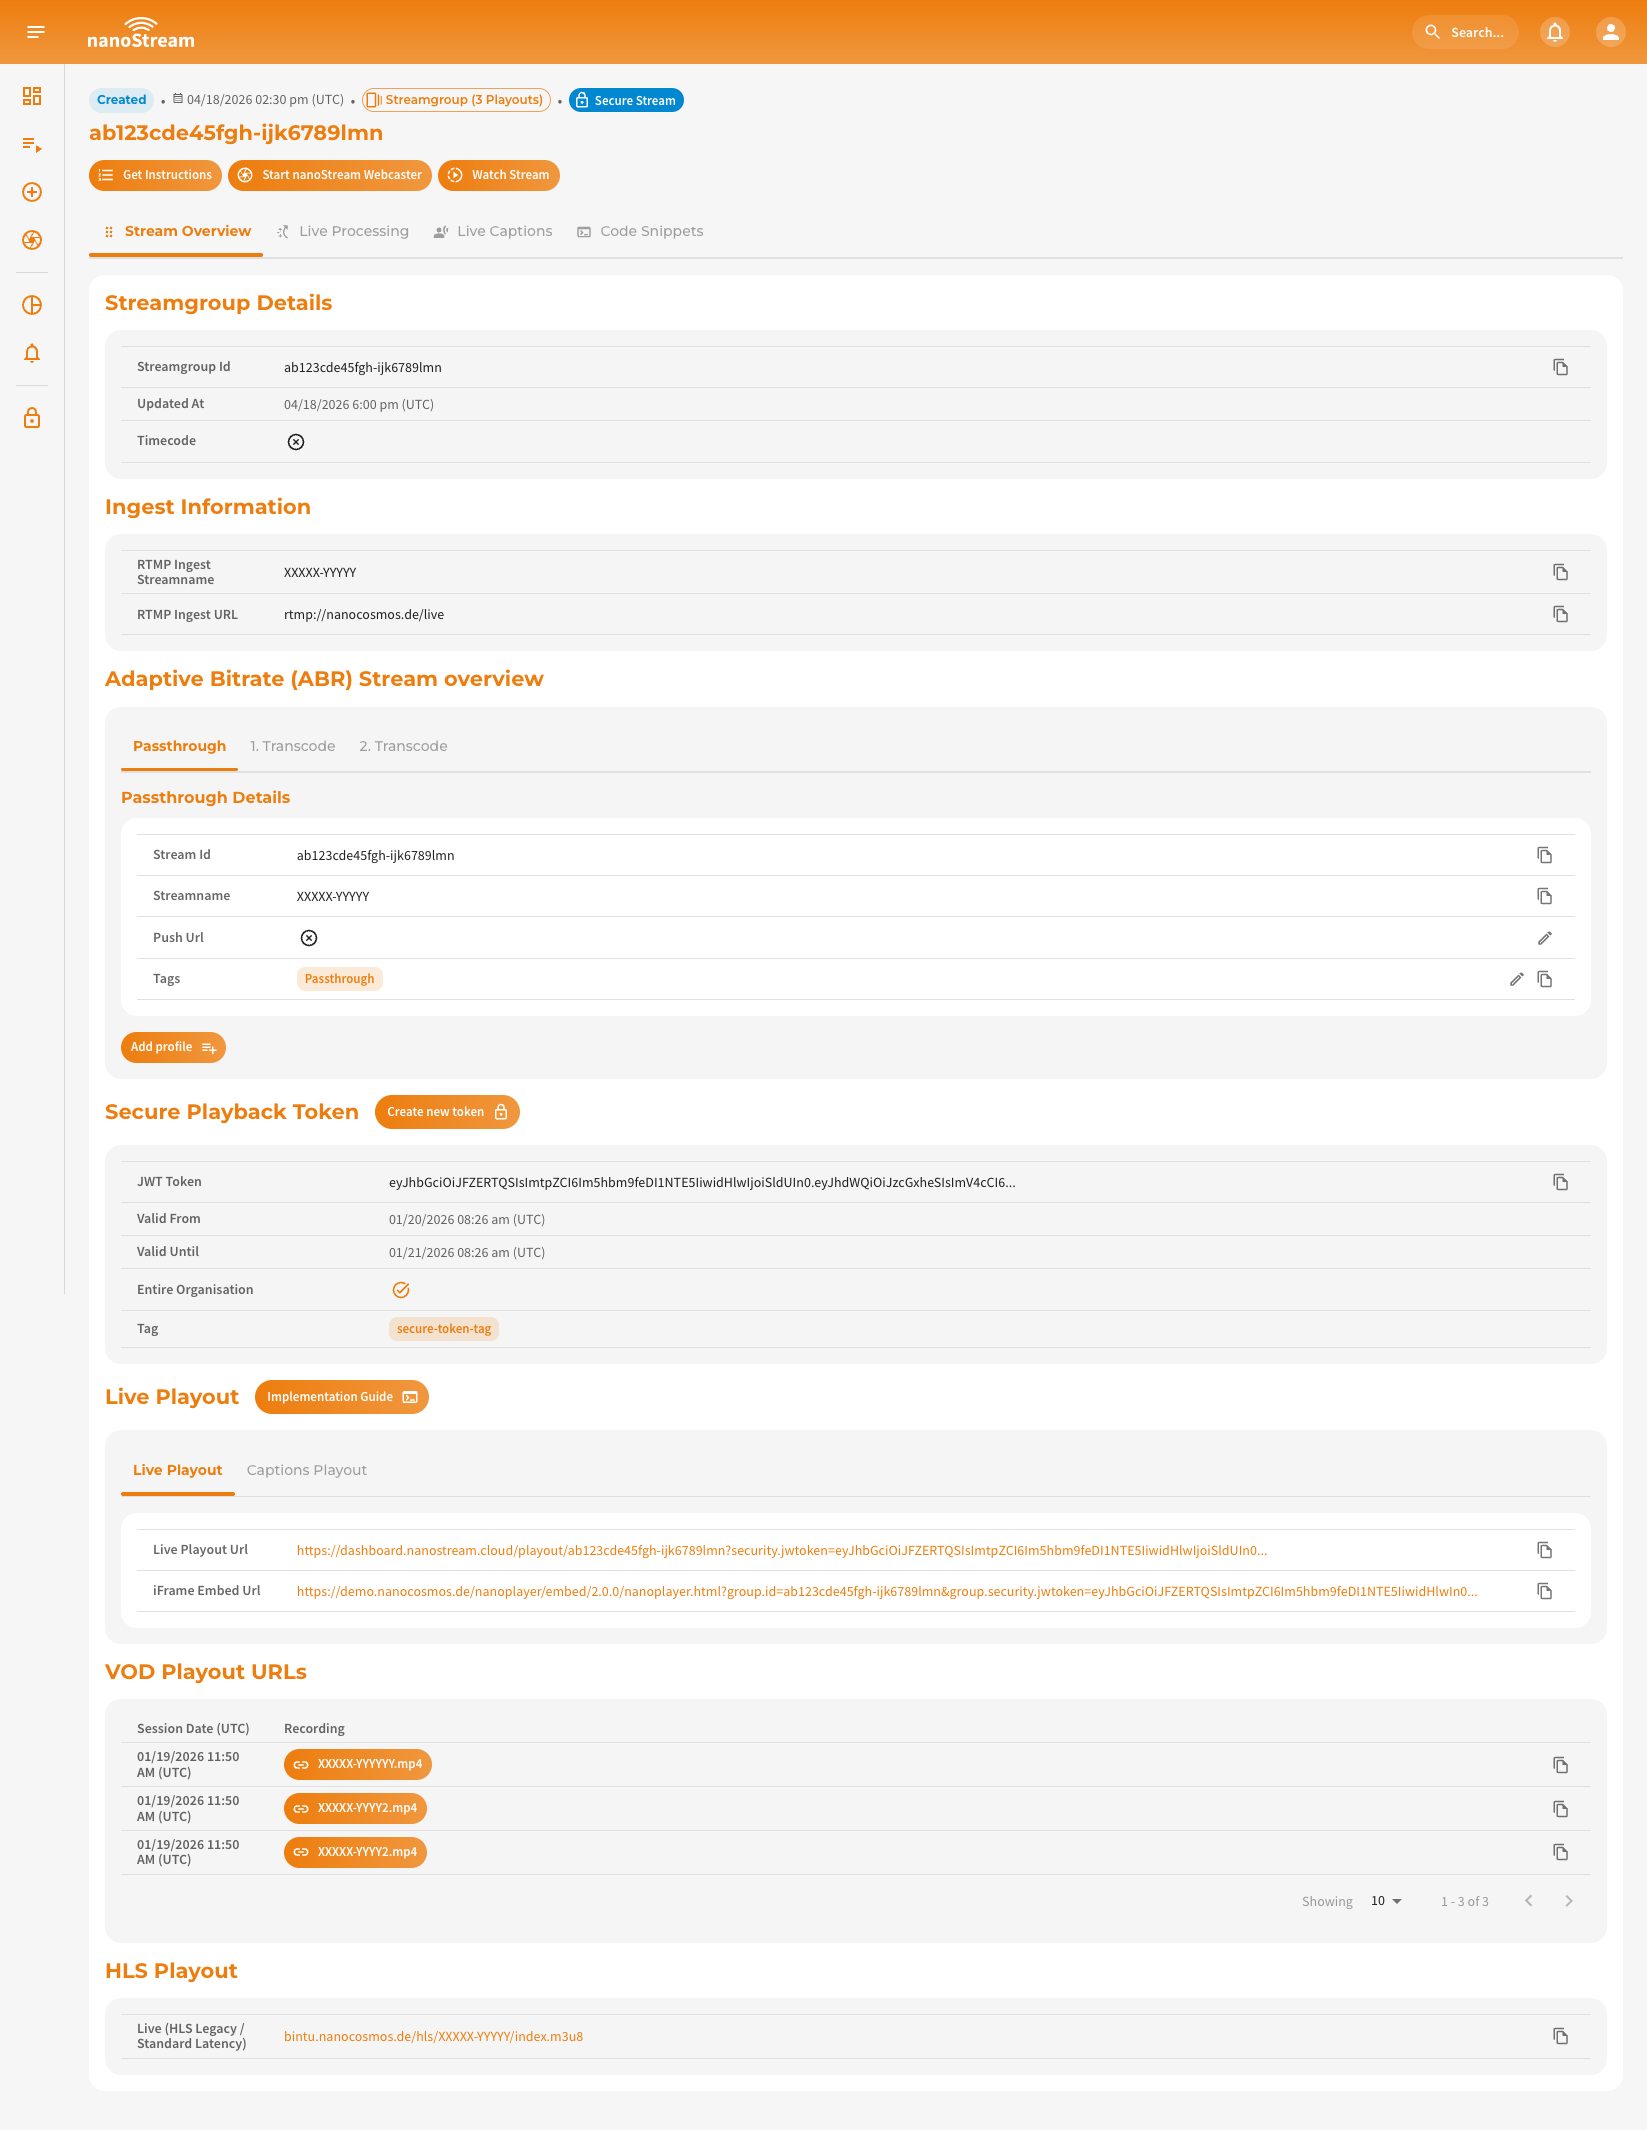 Screenshot: Example Stream Overview (Streamgroup)
Embed the nanoPlayer on your web page
Embedding a live stream into your own website is incredibly simple with nanoStream. Each stream has a unique code snippet that is automatically updated to your setup, requiring you to only copy and paste it into the right place.
You can choose between two types of code snippets for embedding:
- iframe Embed Tag (recommended for quick integration)
- JavaScript Code Snippet (for advanced customizations)
You can find these snippets in multiple locations within the dashboard:
- dashboard.nanostream.cloud/stream/YOUR-STREAM-ID/code-snippets
- dashboard.nanostream.cloud/stream/new/YOUR-STREAM-ID
- dashboard.nanostream.cloud/playout/YOUR-STREAM-ID
- dashboard.nanostream.cloud/webcaster/YOUR-STREAM-ID
- To see all 4 options for configuration, have a look at the nanoPlayer Getting Started section
- To understand how to personalise the code snippet, you can take a look at the Code Snippets Settings section.
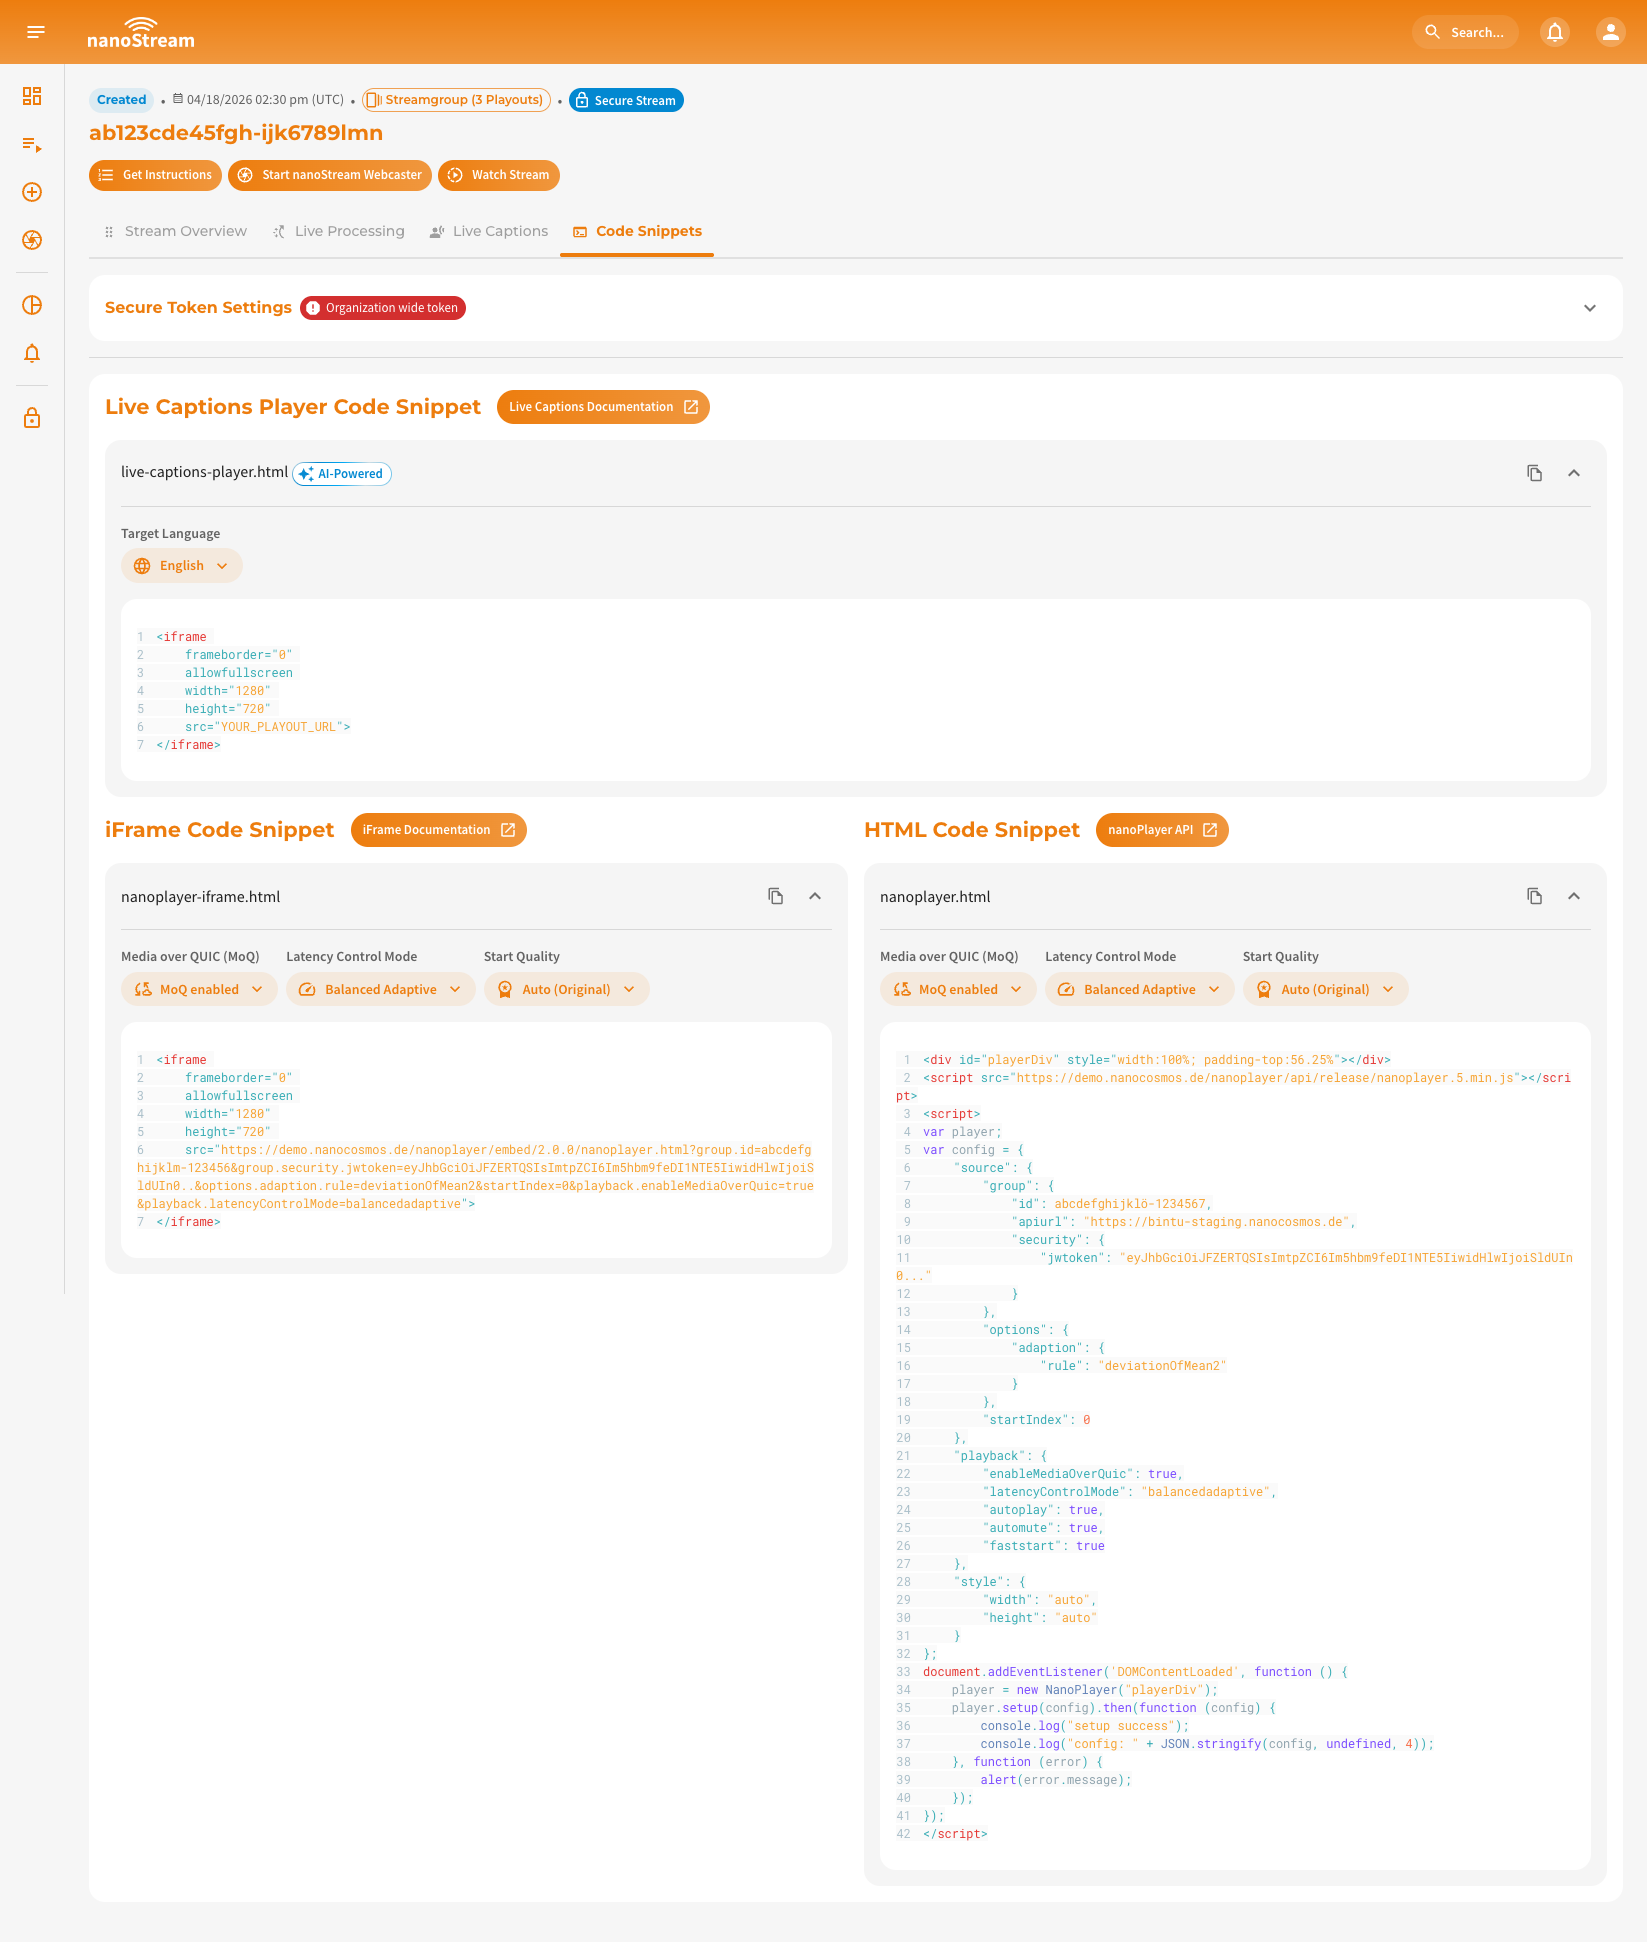 Screenshot: Code Snippets
Additional features
The nanoStream Platform offers several features that can boost your use case, like Secure Streaming, Live Recording or Analytics.
To make use of the additional features mentioned below, it must be explicitly enabled for your organization. Activation may be subject to additional pricing or service terms.
You can verify whether this feature is available by navigating to dashboard.nanostream.cloud/organisation in your dashboard.
In the Enabled Packages section, locate the entry for the feature you are looking for. If it shows Upgrade needed, please contact us.
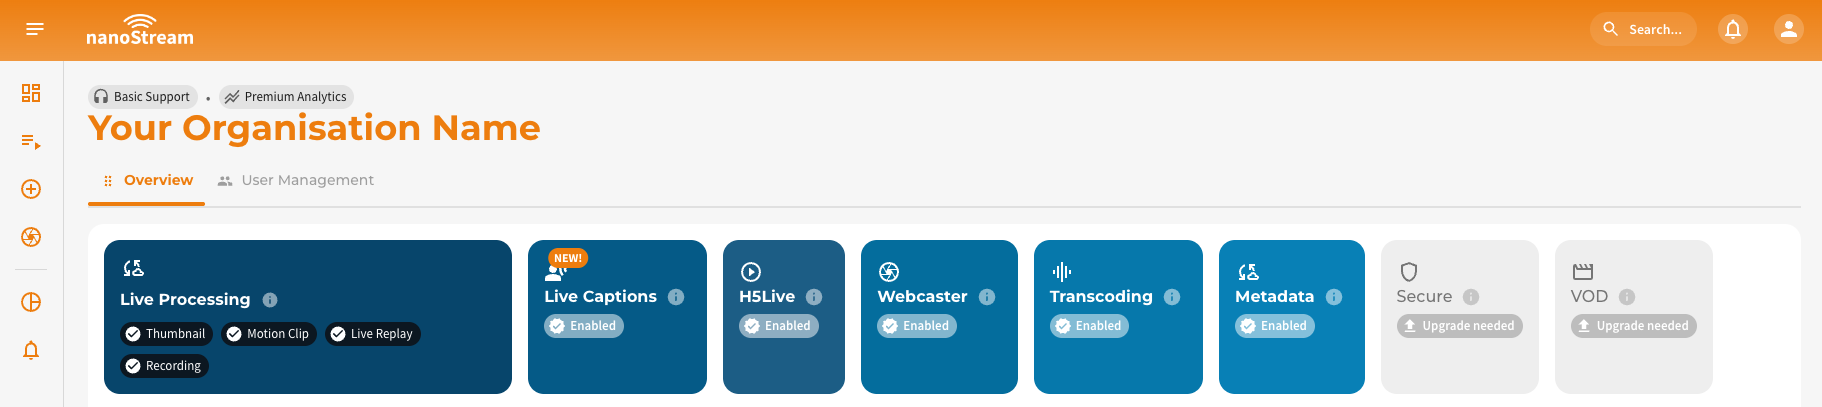
To activate features or learn more about available plans, feel free to reach out via nanocosmos.net/contact. We're happy to assist you in finding the best setup for your use case.
Analytics
nanoStream Analytics gives you clear insights into the performance, reach, and stability of your live streams. It helps you monitor QoS (Quality of Service) and QoE (Quality of Experience) in real time so you can deliver a reliable streaming experience to all viewers. Some key benefits are:
- Comprehensive Metrics: Usage, traffic & demographics
- Live Metrics Monitoring: Real-time performance dashboard
- Custom Live Alerts: Proactive issue notifications
- Business Intelligence: Advanced tagging & filtering
- Client-side Insights: Viewer behavior analysis
- IP and referral blocking: Active stream protection
For deeper insights, we have dedicated explanations and sections for the usage of the nanoStream Analytics.
- Learn more about the charts in the nanoStream Cloud Dashboard: Analytics in the Dashboard
- Alerts and Advices: Get recommendations how to enhance the viewer experience
- For a general introduction into nanoStream Analytics, read more here
Secure Streaming
nanoStream Cloud provides various layers of stream protection to secure both ingest and playback. Security can be applied through RTMPS, WebRTC, Geo/IP restrictions, or token-based playback control.
Common options include:
- Encrypted ingest (e.g., RTMPS instead of RTMP)
- Geo-blocking and IP filtering
- Referrer protection
- Token-based playback security (H5Live Tokens)
Example ingest comparison:
| Type | Example |
|---|---|
| RTMP (non-encrypted) | rtmp://bintu-stream.nanocosmos.de:1935/live/STREAM-NAME |
| RTMPS (encrypted) | rtmps://bintu-stream.nanocosmos.de:1937/live/STREAM-NAME |
| SRT (encrypted) | srt://bintu-srt.nanocosmos.de:5000?streamid=push:STREAM-NAME&... |
- Read more on how to block specific IP addresses and referrers and even entire CIDR masks from accessing your stream with the nanoStream Guardian
- Learn how nanoStream Cloud protects your account and organisation's operations with Role-Based Access Control (RBAC)
Live Recording & VOD
Live content can also be turned into video on demand (VOD) so you can download it or replay it later. The VOD files can be found in the nanoStream Cloud Dashboard in the respective stream overview or requested via the Get Stream Info API Call.
You can check whether your live content is being recorded as VOD by looking at the ingest URL. If the term rec appears in the URL instead of live, it is being recorded.
| Type | Ingest URL | Description |
|---|---|---|
| Not recording | rtmp://bintu-stream.nanocosmos.de/live/STREAM-ID | Default, if your organization doesn't have VOD enabled - live content only |
| Recording | rtmp://bintu-stream.nanocosmos.de/rec/STREAM-ID | Default, if your organization has VOD enabled - Records the entire stream |
Live Recording and Processing
Live Recording and Live Processing features enhance stream output and automate tasks during and after your live event. You can use this for recording live sessions, live replay during the session, still images/thumbnails, and live captions and translations.
- To understand how live processes work in general, check out the Live Processing docs where you can also find examples of use cases
- For instructions on how to use live processing in the nanoStream Cloud Dashboard, click here