nanoStream SDK for iOS
The documentation is updated for nanoStream SDK v.4.10.0.0 and Xcode 11.
Purpose
This documentation is about the nanoStream Live Video Streaming SDK for iOS and can be used by software developers to integrate nanoStream Live Video Encoding into custom apps.
Requirements
- Recommended:
- Apple Mac with macOS 10.15 and Xcode 11
- Apple iPhone/iPad with iOS 13
- Minimal:
- Apple Mac with OS X 10.9 or higher and Xcode 6 or higher
- Apple iPhone/iPad with iOS 8 or higher
Getting Started
Preparation
Add the library libnanostreamAVC.a as a dependency (Link Binary With Libraries) to your project.
Further required dependencies:
libc++.tbdAccelerate.frameworkSystemConfiguration.frameworkVideoToolbox.framework(link as Optional, not as Required)AudioToolbox.framework
The old nanoStream SDK and Xcode versions may additionaly require:
libc++.dylib(instead oflibc++.tbd)libstdc++.dylibAVFoundation.frameworkCoreGraphics.frameworkCoreMedia.frameworkCoreVideo.frameworkFoundation.framework
Include the header libnanostreamAVC.h in your source code.
Check library version
int version = [nanostreamAVC getVersion];
if (version != NANOSTREAM_AVC_VERSION) {
    // Handle header and library version mismatch
}
Initialize the library for broadcasting
For a complete running sample, see LiveEncoder and LiveStream apps included in the SDK package.
Implement the interface nanostreamEventListener in your class:
@interface SampleLiveViewController : UIViewController <nanostreamEventListener>

...

@property (nonatomic, strong) nanostreamAVC *nAVC;
@property (nonatomic, strong) IBOutlet UIView *previewView;

...

@end

@implementation SampleLiveViewController

...

- (void)nanostreamEventHandlerWithType:(nanostreamEvent)type andLevel:(int)level andDescription:(NSString *)description {
    switch (type) {
            case StreamStarted:
                  break;
            case StreamStopped:
                  break;
            case StreamError:
                  NSLog(@"nanostreamEventHandlerWithType:StreamError: %@", description);
                  break;
            case StreamErrorConnect:
                  NSLog(@"nanostreamEventHandlerWithType:StreamErrorConnect: %@", description);
                  break;
            case StreamConnectionStatus:
                  NSLog(@"nanostreamEventHandlerWithType:RtmpConnectionStatus: %@", description);
                  break;
            case StreamSettingCropModeNotSupported:
                NSLog(@"nanostreamEventHandlerWithType:StreamSettingCropModeNotSupported: %@", description);
                      break;
            case StreamSettingLocalRecordingCropModeNotSupported:
                NSLog(@"nanostreamEventHandlerWithType:StreamSettingLocalRecordingCropModeNotSupported: %@", description);
                      break;
            case GeneralError:
                  break;
            default:
                  break;
      }
}

...

@end
Configure the settings object for the library:
nanostreamAVCSettings *nAVCSettings = [[nanostreamAVCSettings alloc] init];

// Set the RTMP URL, you want to stream to
[nAVCSettings setUrl:@"rtmp://localhost/live"];
[nAVCSettings setStreamId:@"myStream"];

// Set the video settings
[nAVCSettings setVideoResolution:Resolution640x480];
[nAVCSettings setVideoBitrate:512];
[nAVCSettings setKeyFramerate:60];
[nAVCSettings setOrientation:AVCaptureVideoOrientationLandscapeRight];
[nAVCSettings setCropMode:NoCrop];
[nAVCSettings setFramerate:30];
[nAVCSettings setH264Level:Baseline30];

// Set the audio settings
[nAVCSettings setInitialVolume:1.0];
[nAVCSettings setAudioMonoStereo:Stereo];
[nAVCSettings setAudioSamplerate:44100.0f];
Then the library itself can be initialized:
// nAVC is a property of the controller class in this example
self.nAVC = [[nanostreamAVC alloc] initWithSettings:nAVCSettings
                                      eventListener:self];

// Set the license key (required for streaming)
[self.nAVC setLicense:@"nlic:1.2:LiveEnc:1.1:LvApp=1.....288"];

// Implement the nanostreamEventListener protocol method
// to display a preview in the previewView
- (void)didUpdatePreviewLayer:(CALayer*)layer {

    // UI View is modified, main queue required
    dispatch_async(dispatch_get_main_queue(), ^{
        if (self.previewView.layer.sublayers.count > 0) {
            self.previewView.layer.sublayers = nil;
        }
        layer.bounds = CGRectZero;
        [layer setFrame:self.previewView.bounds];
        [(AVCaptureVideoPreviewLayer*)layer setVideoGravity:AVLayerVideoGravityResizeAspectFill];
        [self.previewView.layer addSublayer:layer];
    });
}
Start a stream
// Start broadcast asynchronously with completion handler
[self.nAVC start:^(NSXError error) {
    dispatch_async(dispatch_get_main_queue(), ^{
        if (error == NSXErrorNone) {
            // Handle succesful stream start
        } else {
            // Handle failure
        }
    });
}];
Stop a running stream
If the parameter blocking of the stop method is set to YES, all the remaining data (to this moment) will be sent before stopping the stream.
If set to NO, the stream will stop immediately, discarding the remaining data.
    // Stop broadcast asynchronously with completion handler
    [self.nAVC stop:YES withCompletion:^{
      // Use the main queue to update UI
      dispatch_async(dispatch_get_main_queue(), ^{
        // Handle stream stop
      }
    }];
Live Playback
nanoStream supports live playback from RTMP sources.
For a complete running sample, see LivePlayer and LiveStream apps included in the SDK package.
Initialize the library for playback
self.session = [[RtmpSourceCaptureSession alloc] initWithLogLevel:LogLevelMinimal];
self.session.delegate = self;

[self.session setLicense:myLicenseKey];

[self.session setUrl:self.rtmpServerURL];
[self.session setStreamId:self.rtmpStreamName];

...

// Implement the RtmpSourceCaptureSessionStatusListener protocol method
// to display a playback in the playerView
- (void)didUpdateDisplayLayer:(CALayer *)layer {

    // UI View is modified, main queue required
    dispatch_async(dispatch_get_main_queue(), ^{
        if (self.playerView.layer.sublayers == nil) {
            [self.playerView.layer addSublayer:layer];
        } else {
            // Replace a current display layer with the new one
            for (CALayer* subLayer in [self.playerView.layer sublayers]) {
                if ([subLayer isKindOfClass:AVSampleBufferDisplayLayer.class]) {
                    [self.playerView.layer replaceSublayer:subLayer with:layer];
                }
            }
        }

        layer.bounds = CGRectZero;
        [layer setFrame:self.playerView.bounds];
        [(AVSampleBufferDisplayLayer *)layer setVideoGravity:AVLayerVideoGravityResizeAspect];

        [self.session didUpdateDisplayLayerFinished];
    });
}
Start playback
[self.session start:^{
    // Hanlde playback start
}];
Advanced Settings/Usage
Meaning of Events and Errors (nanostreamEvent)
| Event | Meaning |
|---|---|
StreamStarted/StreamStopped | notification that a stream was successfully started/stopped |
StreamConnectionStatus | indicates the connection status: connected, disconnected or reconnecting |
| Error | Meaning |
|---|---|
StreamSettingCropModeNotSupported | a larger input resolution is required for the crop mode |
StreamSettingLocalRecordingCropModeNotSupported | a larger input resolution is required for the local recording crop mode |
StreamErrorConnect | the connection to the server could not be established, server might no be reachable or there are network problems |
StreamErrorConnectSSL | the connection process failed when trying to setup SSL, maybe the server certificates could not be verified |
StreamError | an error occurred while initializing the stream, or during the stream, used license might be invalid or expired |
GeneralError | a general error |
Switch Camera
The camera (front/back) can be switched during preview and broadcast, with the method:
- (bool)useFrontCamera:(bool)value; // Returns true if switch was successful
It is also possible to select the desired camera directly, when initializing the library, by using the property frontCamera of the nanostreamAVCSettings object:
Orientation
The orientation of the stream can be set to portrait or landscape with the property orientation of the settings object.
As of version 4.4.0.6 the orientation can also be changed after the initialization with the property orientation of the nanostreamAVC object itself.
Important:
The orientation change will only affect the stream, but not the preview. The orientation for the preview has to be managed on the application level. This can be achieved by using e.g.
CGAffineTransformMakeRotation.
Stream Type
The SDK supports different streaming modes:
- Video and Audio
- Video only
- Audio only
You can configure the mode with the property streamType of the settings object.
Zoom
The following properties and methods are available for zooming:
/**
 *  maxZoomFactor
 *
 *  Returns the maximum zoom factor that can be set on the current device.
 *  This includes the zoom via upscaling.
 *
 *  @return Maximum Zoom factor that can be set on the current device
 */
- (CGFloat)maxZoomFactor;
/**
 *  Newer devices can use an almost-optical zoom, using the bigger sensor sizes.
 *  Setting the zoom factor to a value smaller than this value uses a lossless
 *  zoom.
 *
 *  @return Max Zoom factor that can be set without using upscaling.
 */
- (CGFloat)maxZoomFactorWithoutUpscaling;
/**
 *  Sets the zoom factor for the camera. Available from iOS 7.1 onwards.
 *
 *  @param factor Double between 1.0 and maxZoomFactor. Will be set for the
 *  current capture device. Will be reset when the device changes (camera rotation)
 *  Zoom factor will be applied with a ramp function, which results in a smooth
 *  transition to the given factor. If a value smaller than
 *  maxZoomFactorWithoutUpscaling is set, the zoom will be lossless.
 *
 *  @return YES if zoom was set. NO if not.
 */
- (BOOL)setZoomFactor:(CGFloat)factor;
Zooming is also demonstrated in the sample project LiveStream, included in the SDK package.
Server Authentication
In case authentication is required, the credentials can be set with the method:
- (void)setAuthentication:(NSString*)user withPassword:(NSString*)password;
The method has to be invoked before a stream is started.
For example:
// Set up nAVC object

...

[nAVC setAuthentication:@"MyUser" withPassword:@"MyPassword"];

...

// Start the stream
Local Recording
It is possible to make a local copy of the stream, on the iOS device.
This is an extra feature and needs to be unlocked by the license - the license should contain the string MP4=2.
NSString *homeDirectory = [NSHomeDirectory() stringByAppendingPathComponent:@"Documents"];
NSDateFormatter *dateFormatter = [[NSDateFormatter alloc] init];
[dateFormatter setDateFormat:@"yyyy-MM-dd_HH-mm-ss"];
NSString *locStr = [homeDirectory stringByAppendingPathComponent:[[dateFormatter stringFromDate:[NSDate date]] stringByAppendingString:@".mp4"]];

[nAVCSettings setLocalRecordingMode:AVCRecordingModeDoubleAtLeastOneMbit];
[nAVCSettings setLocalRecordingPath:locStr];
The following recording modes are available:
AVCRecordingModeStartBitrate: uses the video bitrate set withnanostreamAVCSettingsAVCRecordingModeDoubleAtLeastOneMbit: uses double the video bitrate, but at least1MbpsAVCRecordingMode720p2Mbit: independent of the set video bitrate, always uses2Mbpsand a resolution of1280x720AVCRecordingMode720p4Mbit: independent of the set video bitrate, always uses4Mbpsand a resolution of1280x720AVCRecordingMode1080p4Mbit: independent of the set video bitrate, always uses4Mbpsand a resolution of1920x1080AVCRecordingMode1080p6Mbit: independent of the set video bitrate, always uses6Mbpsand a resolution of1920x1080AVCRecordingMode1080p8Mbit: independent of the set video bitrate, always uses8Mbpsand a resolution of1920x1080
The bitrate for the recording remains constant during a stream. The adaptive bitrate mechanism only influences the bitrate for the stream, but not the bitrate for the recording.
The bitrate for the recording also depends on the video material. If there is a lot of movement in the video the bitrate will be higher than for recordings with little to no movement.
Cropping
Both, the stream and the local recording can be transformed to a different format than the input from the camera.
The following example shows how to crop the format to 16:9.
// Set crop mode for the stream
[nAVCSettings setCropMode:CropTo16By9];

// Set crop mode for the local recording
[nAVCSettings setLocalRecordingCropMode:CropTo16By9];
Adaptive Bitrate
By using the Adaptive Bitrate Control (ABC) the stream will automatically adjust to changes of the bandwidth.
There are two modes available:
AdaptiveBitrateControlModeQualityDegrade: The video quality will be changed if the bandwidth changes. For instance, if not enough bandwidth is available, the video bitrate will be decreased, which in turn degrades the video quality.AdaptiveBitrateControlModeFrameDrop: Low bandwidth is compensated by decreasing the framerate (FPS), but maintaining the video qualtiy.
Make sure to set the ABC settings before a stream is started.
[self.nAVC setAdaptiveBitrateControlMode:AdaptiveBitrateControlModeQualityDegrade];

AdaptiveBitrateControlSettings abr;
abr.minimumBitrate = 100000;  // 100kb
abr.minimumFramerate = 15;
abr.maxPercentBitrateChange = 50;  // If the bitrate drops to less than 50% of the previous bitrate, all buffered data will be discarded

[self.nAVC setAdaptiveBitrateControlSettings:abr];
Possible properties:
| property | default values | range of values | optional |
|---|---|---|---|
minimumBitrate | 5000 (50 kb) | 50000 - 10 000 000 | YES |
minimumFramerate | 15 (fps) | 5 - 60 | YES |
maxPercentBitrateChange | 50 (%) | 0 - 100 | YES |
Statistics during streaming
You can track the current bandwidth with the delegate method:
- (void)nanoStreamStatisticsHandlerWithOutputBitrate:(long long)oBitrate
                                         andFillness:(double)fillness
                              andCurrentVideoBitrate:(long long)vBitrate
                            andCurrentVideoFramerate:(double)vFramerate
This method will be invoked every second.
Meaning of the parameters:
oBitrate: the measured outgoing bitrate for the stream - this is an estimation and probably not 100% accuratefillness: the fillness, in percent, of the buffer used for outgoing packagesvBitrate: the currently used bitrate for videovFramerate: the currently used framerate for video
| property | default values | range of values | optional |
|---|---|---|---|
minimumBitrate | 5000 (50 kb) | 50000 - 10 000 000 | YES |
minimumFramerate | 15 (fps) | 5 - 60 | YES |
maxPercentBitrateChange | 50 (%) | 0 - 100 | YES |
Measuring the available bandwidth
For measuring the available bandwidth you can use the method runBandwidthCheck. After the check finished, the result can be used to set the bitrate for the nanostreamAVC object.
The check measures the bandwidth by running a test stream to the server.
NSXBandwidthCheckSettings *bwSettings = [[NSXBandwidthCheckSettings alloc] init];

// The URL settings are identical to the URL settings for the nanostreamAVCSettings
// for testing the bandwidth it is advised to use the same server you want to stream to
// you might want to use a stream id different from the stream id for the actual stream,
// to distinguish between a bandwidth check and a real stream
bwSettings.url = @"rtmp://localhost/live";
bwSettings.streamId = @"bwcheck";

// The maxium bitrate that should be tested - if this value is lower than the actual bandwidth,
// the result will be similar to the maximum bitrate
bwSettings.maxBitrate = 5000000; // 5Mb

[self.nAVC runBandwidthCheck:bwSettings withCompletionBlock:^(NSXBandwidthCheckResult *measuredBandwidth) {
    NSLog(@"measuredBandwidth: avg=%i, median=%i, min=%i, max=%i, runTimeMs=%i", (int)measuredBandwidth.avgBitrate, (int)measuredBandwidth.medianBitrate, (int)measuredBandwidth.minBitrate, (int)measuredBandwidth.maxBitrate, (int)measuredBandwidth.runTimeMs);
}];
The default run time is 10 seconds. The run time can be changed with the property runTime.
If the bandwidth check should be stopped before it finished on itself, the method stopBandwidthCheck can be used. This will force the bandwidth check to stop and return the result based on the collected information up to this point.
[self.nAVC stopBandwidthCheck]; // Stop bandwidth check if still running
The result of the bandwidth check can be used as bitrate setting for library object. At the moment it is not possible to change the video bitrate after the initialization of the library object, thus the object need to be re-initialized. (This will change in future releases.)
Snaphot from the current stream
To get a snaphot (image) of the current preview/stream, the method grabStillImageWithCompletionBlock can be used.
[self.nAVC grabStillImageWithCompletionBlock:^(UIImage *image, NSError *error) {
      // Do something with the image
}];
Overlay/Watermark
It is possible to use an overlay (image, text, or both) for a stream. Notice that the CPU usage will be increased slightly when an overlay is used.
This is an extra feature and needs to be unlocked by the license - the license should contain the string OVL=1.
The easiest way to use an overlay is to use the class AVCFullImageOverlay:
UIImage *overlayImg = [UIImage imageNamed:@"button"];  // Uses an image from the bundle resources, named "button"

UIGraphicsBeginImageContextWithOptions(CGSizeMake(640, 480), NO, 1.0);  // Assuming the video resolution is set to "Resolution640x480"
[overlayImg drawInRect:CGRectMake(200, 200, 240, 80) blendMode:kCGBlendModeNormal alpha:0.5];
UIFont *font = [UIFont boldSystemFontOfSize:20];
[[UIColor whiteColor] set];
NSString *text = @"Watermark";
[text drawInRect:CGRectMake(200, 300, 100, 50) withFont:font];
UIImage *finalOverlayImage = UIGraphicsGetImageFromCurrentImageContext();
UIGraphicsEndImageContext();

[self.nAVC setOverlay:[[AVCFullImageOverlay alloc] initWithImage:finalOverlayImage]];
Notice that the final output resolution can be different, if an option like cropping is used. In this case it is better to implement your own overlay class, which is shown in the following example:
@interface NSXWatermark () : NSObject `<AVCOverlay>`
@property (assign) AVCOverlayRawBuffer buffer;
@property (strong) __attribute__((NSObject)) CFDataRef imageDataForBuffer;
@end
@implementation NSXWatermark
@synthesize overlayBoundingRect;
@synthesize imageSize;
- (AVCOverlayRawBuffer)overlayImageWithStreamTime:(NSTimeInterval)time {
if (self.buffer.buffer == NULL) {
UIImage *image = [self generateWatermarkWithSize:self.imageSize inBoundingRect:self.overlayBoundingRect];
if (image) {
[self setupBufferWithImage:image];
}
}
return self.buffer;
}
- (UIImage *)generateWatermarkWithSize:(CGSize)size inBoundingRect:(CGRect)boundingRect {
UIImage *overlayImage;
CGFloat padding = 10.0;
// Permanent Overlay
CGRect permRealRect;
UIImage *permanentImage = self.permanentOverlayImage;
if (permanentImage) {
CGSize overlaySize = permanentImage.size;
CGFloat height = size.height / 3;
if (overlaySize.height > height) {
overlaySize.width = height;
overlaySize.height = height;
}
CGFloat boundingMaxX = boundingRect.origin.x + boundingRect.size.width;
CGFloat boundingMaxY = boundingRect.origin.y + boundingRect.size.height;
CGRect permOverlayRect = CGRectMake(boundingMaxX - overlaySize.width/2, boundingMaxY - overlaySize.height/2, overlaySize.width/2, overlaySize.height/2);
permRealRect = AVMakeRectWithAspectRatioInsideRect(permanentImage.size, permOverlayRect);
permRealRect.origin.y -= padding;
permRealRect.origin.x -= padding;
}
UIGraphicsBeginImageContext(size);
if (permanentImage) {
[permanentImage drawInRect:permRealRect];
}
overlayImage = UIGraphicsGetImageFromCurrentImageContext();
UIGraphicsEndImageContext();
return overlayImage;
}
- (void)setupBufferWithImage:(UIImage *)image {
CGImageRef rawPic = [image CGImage];
CFDataRef data = [NSXWatermark copyDataFromUIImage:rawPic];
AVCOverlayRawBuffer buf = [NSXWatermark makeBufferFromData:data andImage:rawPic];
self.buffer = buf;
self.imageDataForBuffer = data;
CFRelease(data);
}
+ (CFDataRef)copyDataFromUIImage:(CGImageRef)image {
CGDataProviderRef inProvider = CGImageGetDataProvider(image);
CFDataRef inBitmapData = CGDataProviderCopyData(inProvider);
return inBitmapData;
}
+ (AVCOverlayRawBuffer)makeBufferFromData:(CFDataRef)inBitmapData andImage:(CGImageRef)rawPic {
AVCOverlayRawBuffer rawBuf;
size_t inBitmapDataBytesPerRow = CGImageGetBytesPerRow(rawPic);
UInt8 *buffer = (UInt8*)CFDataGetBytePtr(inBitmapData);
rawBuf.buffer = buffer;
rawBuf.bytesPerRow = (int)inBitmapDataBytesPerRow;
rawBuf.bufferType = AVCOverlayBufferTypeBGRA;
eturn rawBuf;
}
@end
If you want to use a dynamic overlay, e.g. a scoreboard, you can modify the above class (NSXWatermark) like so:
...

@property (strong) NSString *overlayURL; // Needs to be set
@property (nonatomic, strong) NSDate *date;
@property (nonatomic, strong) UIImage *watermarkHttpImage;

...

- (AVCOverlayRawBuffer)overlayImageWithStreamTime:(NSTimeInterval)time {
    if (!self.date) {
        self.date = [NSDate date];
    }
    NSTimeInterval timeInterval = time <= 0.6 ? 0.6 : time;
    NSTimeInterval passedTime = [[NSDate date] timeIntervalSinceDate:self.date];
    if (passedTime > timeInterval && self.overlayURL) {
        [self loadHTTPImageAsync];
        UIImage *image = [self generateWatermarkWithSize:self.imageSize inBoundingRect:self.overlayBoundingRect];
        if (image) {
            [self setupBufferWithImage:image];
            self.date = [NSDate date];
        }
    } else if (self.buffer.buffer == NULL) {
        UIImage *image = [self generateWatermarkWithSize:self.imageSize inBoundingRect:self.overlayBoundingRect];
        if (image) {
            [self setupBufferWithImage:image];
            self.date = [NSDate date];
        }
    }

    return self.buffer;
}

- (UIImage *)generateWatermarkWithSize:(CGSize)size inBoundingRect:(CGRect)boundingRect {

    ...

    // Dynamic Overlay
    CGRect dynRealRect;
    UIImage *dynamicWatermarkImage = self.watermarkHttpImage;
    if (dynamicWatermarkImage) {
        CGSize overlaySize = dynamicWatermarkImage.size;

        CGFloat height = size.height / 3;
        if (overlaySize.height > height) {
            overlaySize.width = height;
            overlaySize.height = height;
        }

        CGRect dynOverlayRect = CGRectMake(0, 0, overlaySize.width, overlaySize.height);

        dynRealRect =  AVMakeRectWithAspectRatioInsideRect(dynamicWatermarkImage.size, dynOverlayRect);

        dynRealRect.origin.y = padding;
        dynRealRect.origin.x = padding;
    }

    ...

}

- (void)loadHTTPImageAsync {
    dispatch_async(dispatch_get_global_queue(0,0), ^{
        NSData *data = [[NSData alloc] initWithContentsOfURL:[NSURL URLWithString:self.overlayURL]];
        if ( data == nil )
            return;
        dispatch_async(dispatch_get_main_queue(), ^{
            self.watermarkHttpImage = [UIImage imageWithData:data];
        });
    });
}

...
initWithSession
Instead of letting the SDK manage the video and audio input, you can also do that yourself. This is helpful to supply video and audio samples which are not coming from the standard input devices. Or to modify video and/or audio samples before they are used for the stream.
The SDK provides a separate init method initWithSession.
An example for a custom capture session, which supplies CVPixelBufferRef's to the SDK:
@interface CustomCaptureSession : AVCaptureSession

@property (nonatomic, strong) AVCaptureVideoDataOutput* myVideoOutput;
@property (nonatomic, strong) AVCaptureAudioDataOutput* myAudioOutput;

...

@end

@implementation CustomCaptureSession

- (void) addOutput:(AVCaptureOutput *)output {
    if ([output isKindOfClass:[AVCaptureVideoDataOutput class]]) {
        self.myVideoOutput = (AVCaptureVideoDataOutput*)output;
    } else if([output isKindOfClass:[AVCaptureAudioDataOutput class]]) {
        *self.myAudioOutput = (AVCaptureAudioDataOutput*)output; * if you want to use a custom audio capture device
        [super addOutput:output]; // Uses the standard microphone of the iOS device
    }
}

- (void) addInput:(AVCaptureInput *)input {
    [super addInput:input]; // This is required, because nanostreamAVC checks the available inputs
}

- (void) startRunning {
    [super startRunning];
}

// This method has to be called periodically - e.g. with CADisplayLink
- (void) supplyCMSampleBufferRef {
    CVPixelBufferRef buffer = [self getCVPixelBufferRef]; // Get the CVPixelBufferRef from somewhere

    CMSampleBufferRef newSampleBuffer = NULL;
    CMSampleTimingInfo timingInfo = kCMTimingInfoInvalid;
    timingInfo.duration = CMTimeMake(33, 1000);    // Assuming 30fps, change if otherwise
    timingInfo.decodeTimeStamp = CMTimeMake(ts, 1000);    // Timestamp information required
    timingInfo.presentationTimeStamp = timingInfo.decodeTimeStamp;

    CMVideoFormatDescriptionRef videoInfo = NULL;
    CMVideoFormatDescriptionCreateForImageBuffer(NULL, buffer, &videoInfo);

    CMSampleBufferCreateForImageBuffer(kCFAllocatorDefault, buffer, true, NULL, NULL, videoInfo, &timingInfo, &newSampleBuffer);

    // The following line submits the new CMSampleBufferRef to the nanostreamAVC lib
    [self.myVideoOutput.sampleBufferDelegate captureOutput:self.myVideoOutput didOutputSampleBuffer:newSampleBuffer fromConnection:nil];

    CFRelease(videoInfo);
    CFRelease(buffer);
    CFRelease(newSampleBuffer);
}

@end

// You need to use initWithSession for nanostreamAVC to use your custom session

...

session = [[CustomCaptureSession alloc] init];

// Use microphone from iOS device as audio source
NSError *error;
AVCaptureInput *audioInput = [AVCaptureDeviceInput deviceInputWithDevice:[AVCaptureDevice defaultDeviceWithMediaType:AVMediaTypeAudio] error:&error];

if (audioInput != nil) {
    [session addInput:audioInput]; // If the stream should be video only, don't add an audioInput
}

[session startRunning];

...

self.stream = [[nanostreamAVC alloc] initWithSession:session settings:nAVCSettings eventListener:self];

...
Specific use cases
Stream from a GoPro
Instead of using the build-in camera and microphone of an iOS device, it is also possible to use external devices like a GoPro camera.
To use this feature you will need a special build of our SDK. Please contact us for more information.
The following pseudo code shows how to use a GoPro camera as source:
#import "nanostreamAVCExternals.h"

@interface YourLiveViewController `<nanostreamEventListener, ExtendedCaptureSessionStatusListener>`

...

@property (nonatomic, strong) nanostreamAVC *stream;
@property (strong) AVCaptureSession *session;
@property (nonatomic, strong) IBOutlet UIView *cameraView;

...

@end

@implementation YourLiveViewController

...

if (self.cameraSource == GoProHero3) {
    self.session = [[HLSCaptureSession alloc] initWithPreview:cameraView andStatusListener:self andUDP:NO];

}
else if (self.cameraSource == GoProHero4) {
    self.session = [[HLSCaptureSession alloc] initWithPreview:cameraView andStatusListener:self andUDP:YES];
}

[self.session startRunning];

// Set up settings for nanostreamAVC

...

self.stream = [[nanostreamAVC alloc] initWithSession:self.session
                                            settings:nAVCSettings
                                       eventListener:self];

...

@end
Stream from a Drone
Get in touch with us to learn how to send a live stream from a Drone (Parrot Bebop or DJI)
Possible Issues
General
For older versions of the sdk, without support for arm64, architecture in Xcode has to be set to armv7 and/or armv7s. This works also for newer iOS-Devcies like iPhone 5s.
This is not required for newer sdk versions, which also support arm64.
Compiler/Linker
libstdc++
If there are linker errors with std::: "symbol(s) not found for architecture", make sure that you added the libraries libstdc++.dylib and libc++.dylib to your project.
Due to a bug in Xcode, depending on the selected Base SDK and deployment target, there might be still linker errors regarding "std". In this case you need to add a specific version of the libstdc++ to your project, e.g.: libstdc++-6.0.9.dylib instead of libstdc++.dylib
Undefined Symbols for Parrot & DJI
The following part is only relevant for SDK versions from 3.3.x to 4.1.x. As of version 4.2.x the drone dependencies are removed from the standard SDK package.
It might be possible that there are linker errors for the classes
ParrotBebopCaptureSessionorDJIPhantom2CaptureSession
Generally, if the Parrot & DJI extensions are not used, the symbols should be stripped automatically by Xcode and you do not need to link the frameworks.
However this is not the case when the linker flag -ObjC is used in the app project. This causes the linker to load all symbols included in all linked object files (including the Parrot & DJI symbols). This prevents the automatic stripping.
To use our library without Parrot & DJI, either remove the -ObjC linker flag from the project or replace the -ObjC linker flag with the -force_load flag for each library that you want to use. Do not use -force_load with libnanostreamAVC.a.
For examples see
Duplicate Symbols
If there are duplicate symbol errors, check the "Other Linker Flags" setting. Select a target, go to "Build Settings" and type into the search field "Other Linker Flags".
Check if the linker flag -all_load is used. Either remove the flag or if you have to use it, consider using the flag -force_load or -ObjC instead.
See also here for more information on the "-force_load" flag
Check also this information if you have a "selector not recognized" runtime exception
Breakpoints
If you debug your application, it is possible that breakpoints are being hit due to internal exceptions. Exceptions on the SDK level are handled in the SDK and do not affect the workflow of your application.
You can prevent the breakpoint from pausing the workflow of your application, if you use the right settings for the breakpoint. The default setting is most likely that every exception causes a break. To change that, use the settings from the following screenshot:
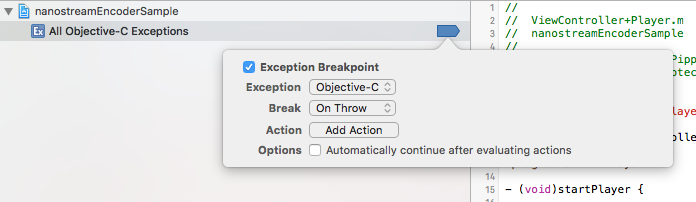
This way only Objective-C exceptions will be catched and C++ exceptions will be ignored.
Crashes
CALayerGetDelegate / CALayerGetSuperlayer / Other CALayer
If there are crashes occurring in your app that include above symbols in the stack trace and are otherwise not obvious, check to see if you added a subviews to the preview view. The UIView instance that is passed to
- [RtmpSourceCaptureSession initWithPreview:andStatusListener:andLogLevel:]
and
- [nanostreamAVC initWithSettings:uiPreview:eventListener:]
cannot contain any subviews (UIButtons or otherwise).
Logging Information
If you encounter a problem with the nanostreamAVC library and you want to report the problem, log files will help us to comprehend the problem.
Please use the following steps to create the log files:
- for the encoder (nanostreamAVC): enable logging for the library with the method "SetLogLevel", use LogLevelCustomSupport (if not available use LogLevelVerbose):
[self.nAVC SetLogLevel:LogLevelCustomSupport]; // set the log level before the method "start" is invoked
- for the player (RtmpSourceCaptureSession): the log level has to be set in the constructor:
self.session = [[RtmpSourceCaptureSession alloc] initWithPreview:self.playerView andStatusListener:self andLogLevel:LogLevelCustomSupport];
try to reproduce the problem
download the app container (for your app) from the iOS device with
Xcode, as explained herein Finder right click on the downloaded container and select
Show Package Contentssend us all log files located (in the container) in the folder
/AppData/Library/Caches/Logs/
Crash Logs
If you encounter a crash, please send us the crash log as explained in the following steps:
- Plug in the device and open
Xcode - Choose
Window --> Devicesfrom the menu bar - Under the DEVICES section in the left column, choose the device
- To see the device console, click the up-triangle at the bottom left of the right hand panel
- Click the down arrow on the bottom right to save the console as a file
- To see crash logs, select the View Device Logs button under the Device Information section on the right hand panel
- Wait until the Scanning Process is complete, this can take a while (there should be a text at the top of the Window, something like "Scanning '...crash'...")
- Use the column
Date/Timeto order the crashes after dates. - Find your app in the Process column and select the Crash log to see the contents.
- To save a crash log, right click the entry on the left column and choose
Export Log
Taken from here